
As I promised, I will share with you a few tips and techniques that I used on the layouts I made for My Creative Scrapbook this month. Of course you can see more tips from the rest of the DT at the forum--->Here
I warn you! It is a Loooooong post! Take a cup of coffee or a drink and sit back!
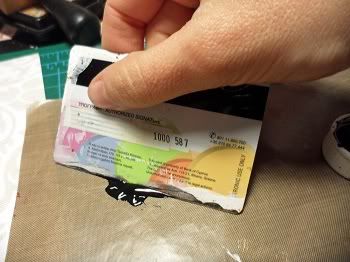
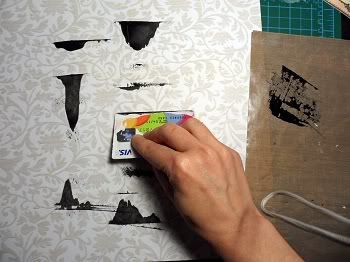
To make this artsy background, you need a credit card or spatula and acrylic color. You dιp the card into the paint (it could be gesso as well) and start making moves up & down/left & right...
have you seen "karate kid"??? LOLOL
have you seen "karate kid"??? LOLOL
***
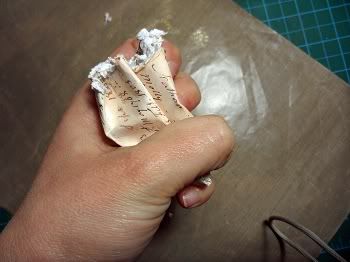
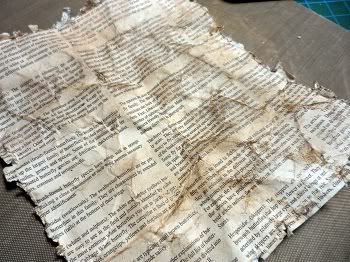
To give a vintage feeling to your paper and really distressed look, you spritz it with water
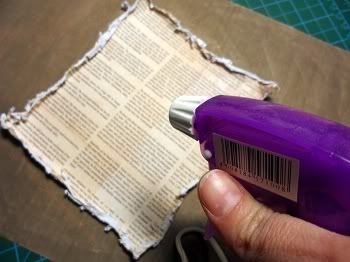
and squize it gently with your hand!
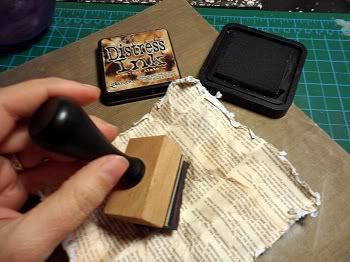
After that, you apply distress ink using a foam pad to point out the wrinkles!
and squize it gently with your hand!
After that, you apply distress ink using a foam pad to point out the wrinkles!
***
If you don't have a swirl that fιts your colors or design, make your own using stickles! To be accurate, use a stencil!
***
Well, I liked the chipboard's pale brown natural color but I wanted to highlight it a bit!
So I randomly inked it with two different shades of brown and covered it with crackle paint rock candy!
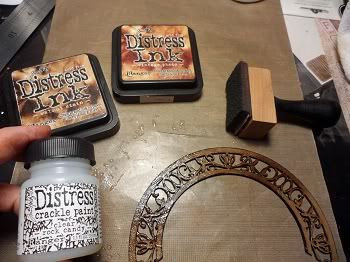

So I randomly inked it with two different shades of brown and covered it with crackle paint rock candy!
***
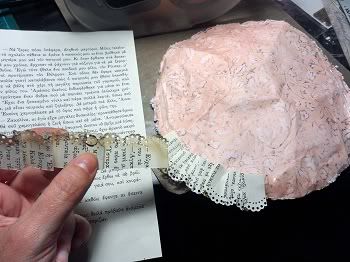
 to make these beautiful vintage ruffles behind the circle.....
1) I cut strips from an old book,2) I use a border punch,3) I ink them with some brown distress ink, 4) with my fingers I press them randomly into ruffles, 5) I glue them around on the back of my circle!
***
I will show you step by step how to achieve this background!

1) Use a mask and dab a chalk ink or use a foam pad and distress ink above the mask (don't mind my finger..it is a mess..lol) (Prima Mask)

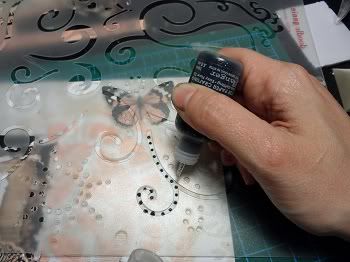
2) Then use a mask and glimmer mist or chalk mist. you can use more than one colors!

3) Use a music or letter stamp with versamark ink and stamp randomly all around the paper

1) Use a mask and dab a chalk ink or use a foam pad and distress ink above the mask (don't mind my finger..it is a mess..lol
) (Prima Mask)2) Then use a mask and glimmer mist or chalk mist. you can use more than one colors!
3) Use a music or letter stamp with versamark ink and stamp randomly all around the paper
tip: I don't use an acrylic block for that, just my fingers!That way I avoid the square shaped stamping!
4) I have put coper embossing powder on the places I stamped and melt it with a heat gun.

5)Mix some gesso with black acrylic paint and dab it above a mask using a brush. That way you achieve some extra thick texture. (Prima Gate Mask)


6) I decided to use an extra mask (clock) and glimmer mists (gold and suede)

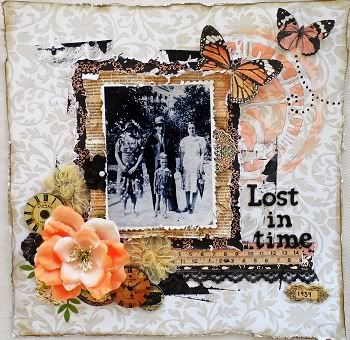
and this is the finished layout:

4) I have put coper embossing powder on the places I stamped and melt it with a heat gun.
5)Mix some gesso with black acrylic paint and dab it above a mask using a brush. That way you achieve some extra thick texture. (Prima Gate Mask)
6) I decided to use an extra mask (clock) and glimmer mists (gold and suede)
and this is the finished layout:
***
I hope you enjoyed my post and I hope I have explained everything correctly!
Have a nice creative day!
xoxoxo
38 comments:
Ουάου!!!! Πολύ κατατοπιστικές οδηγίες και φωτογραφίες. Ευχαριστούμε πολύ για το υπέροχο μάθημα. Πολύ χρήσιμα όλα. Να το κάνεις συχνά.
Υ.Γ. Τελείωσε ήδη το καφεδάκι μου! Πάω για το δεύτερο!!! Την καλημέρα μου.
Fantastic....I said it before the end result is absolutely stunning!!
hugz
irini
κατατοποιστικοτατες οι οδηγιες σου Βικυ!!!!!!!!!!!ευχαριστουμε!!!!!!!!!
Ευχαριστουμε για τις οδηγιες !!!
ευχαριστούμε για αυτό το φοβερό μάθημα!φιλιά!
Καλημέρα Βίκυ! Βλέπουμε αγκαλιά με τον Βασιλάκη της οδηγίες σου κι έχει εντυπωσιαστεί!!!! Γιατί λερώθηκε το χεράκι, ρωτάει : ) Αν δεν λερωθείς, δεν γίνεται δουλειά χαχαχα Ευχαριστούμε πολύ Βίκυ, έχεις κάνει φοβερή δουλειά!!!! Καλό ΣΚ!!!
τέλειο μάθημα, ευχαριστούμε Βίκυ!!!
Oh thank you for sharing your tips about how you created these fabulous layouts.. I really learnt a lot.. thank you for taking the time to take the photos and put this post all together,, I appreciate you doing all that!!
Thanks so much for sharing all these fabulous techniques! I love the one with paint & credit card, the vintage book paper & ruffled bookpaper around the circle :)
This is fantastic! SO many techniques :) Thanks for sharing!
Thank you Vicki, I've just purchased the gate mask and wasn't sure what to do with it but now I'll try your technique. Love all the other techniques as well.
Ευχαριστούμε ΠΑΡΑ πολύ για το tutorial - πραγματικά πολύ χρήσιμο... μου άρεσε παρα πολύ αυτό που έκανες με τη σφραγίδα με το versamark!!! Δεν παίρνει πολύ χρόνο όλη αυτή η διαδικασία;;; χαρά στην υπομονή σου!!
Εμένα ΔΕΝ μου φάνηκε μεγαλη η ανάρτηση, σαν νεράκι την απόλαυσα:) εδω και καιρο θελω να δοκιμάσω κατι που είδα σε σένα αλλα δεν το βρήκα τωρα το ποστ σου, ειναι η τεχνική που βαζεις cracle accents(αν το θυμαμαι καλα) και μετα βαζεις χρωμα απο πάνω το οποίο σκουπίζεις αμέσως και ισχωρεί στο εσωτερικό το χρώμα...βγαζεις νόημα...? αλλα εχω μπερδευτεί με τα τοσα κρακλ-ο-προιόντα :) τώρα χρησιμοποίησες cracle paint, ποιά η διαφορά...? αν βρεις χρόνο πες μου :) Σε ευχαριστώ πολύ!!!
Enjoyed, Vicky....understatement of the century...RIVETTED to your post is more like it!!!!!!!!!! I've had my notebook out popping in all these FAB hints...LOVE the 'ruffle paper' one, & how to do that bg with the gates...the idea about NOT using a stamping block....just GREAT. Thanks sooooo much for sharing & also, LOVE the photos....makes it 'make sense':):):)
Wow! Thanks for sharing! It looks beautiful and like LOTS of FUN!
Vicky. Your work is stunning to say the very least! Wow, you are so talented!! Thankyou for taking part in our challenge at NZ paper Chase and sharing your scrapbooking talents with us here in NZ
Φοβερές οι οδηγίες σου, να βάζεις κι άλλες όποτε μπορείς, μπας και βγάλουμε άκρη κι εμείς οι αρχάριες!! Έτσι όπως τα βλέπω βήμα βήμα, θέλει πολύ χρόνο για να βγάλεις το αποτέλεσμα που βλέπω στις συνθέσεις σου,αλλά αξίζει τον κόπο!! Μπράβο Βίκυ μου!!
Sooooooo many amazing tips!!! Thanks for sharing them all!!
Wow! You are so clever Vicky! Thanks for sharing all your beautiful techniques.
Hope you have a great weekend. xx
Πολύτιμες οι οδηγίες σου!!!!!ευχαριστούμε!!!!!φιλιά!!!!
Thanks for sharing your Fabulous techniques!! looks very fun!
Have a nice weekend!! Hugs! :)
AWESOME Vicky!! Thanks for sharing...... ♥
Πολύ όμορφες τεχνικές! Σε ευχαριστούμε που τις μοιράστηκες μαζί μας!! Πολύ όμορφο αποτέλεσμα!
Totally fabulous Vicky!!! Your layouts are so beautiful and thankyou for sharing your wonderful tips and techniques. Think I am going to try the book paper ruffles. :-)
wow wow Vicky totally fab...love your tips...thanks for sharing :)
Βίκυ μπράβο!!!!Σε ευχαριστούμε πάρα πολύ για τις οδηγίες καταπληκτικές οι συνθέσεις σου!!!!
Hi again Vicky, Just wanted to let you know I got your message & have sent you an email....but I'm not sure if it reached you? Hope you're having a great weekend :)
ευχαριστούμε πολύ για τις τεχνικές είναι πολύ χρήσιμες. Το αποτέλεσμα εξαιρετικό!!!
Thank you so much for taking the time to share these fantastic techniques with us! So often we see the beautiful layouts and wonder "How did they do that?" Now we all know, and since imitation is the most sincere form of flattery you may see us all using these methods. Thanks xx
Και εμένα δεν μου φάνηκε καθόλου μεγάλη η ανάρτηση!Την κατά ευχαριστήθηκα!Φοβερά tutorial!
Thank you!!
Βίκυ μου σε σευχαριστούμε πάρα πάρα πολύ που μοιράστηκες μαζί μας τις τεχνικές σου!
Είναι υπέροχο αυτό, γιατί δεν έχουν όλα τα κορίτσια τη δυνατότητα να παρευρίσκονται σε crops η να παρακολουθούν online μαθήματα, οπότε κάτι τέτοιο είναι πραγματικά πολύ ωραίο!
Ευχαριστούμε για τις οδηγίες κοριτσάκι!!! ελπίζω το καλοκαίρι να μου κάνεις ιδιαίτερα μαθήματα!!!!!
wow, thank you so much! these are awesome techniques!
Βίκυ μου, φανταστικές τεχνικές!!!! Ευχαριστούμε πολύ!!!!
wow! awesome layouts! thanks for the techniques!
Oh wow thanks for all this Vicky - this is sooo yummy!! You have a great idea there mixing the gesso in with the paint for extra thickness - never thought of that! And I have that exact mask still unopened!! I actually bought 2 by mistake so one is up on my blog in my giveaway!
Love to see how you made such a complicated LO!
This is fantastic! SO many techniques!
Thanks for sharing!
Post a Comment